Snartemo-Style Tablet Weaving
One of the most complex weaves uses tablets threaded identically, usually with four colors. Designs are made by reversing the turning direction of some tablets to produce long floats. This technique is often called Snartemo after the location where a well-known band was found (5th c. Norway). Although it is theoretically possible to weave these patterns in other ways, in practice Snartemo is always woven by turning tablets individually. Weaving a Snartemo pattern is no harder than any other technique where the tablets are turned individually; the difficulty lies in drafting the pattern. Fortunately, there are only a few simple rules that you need to remember in order to design lovely Snartemo patterns.
Note on Notation: I use the Collingwood definitions of S and Z based on thread direction. In the pattern drafts, a forward slash (/) denotes a forward turn, and a back slash (\) a backward turn. If the tablets are S-threaded, the direction of the slash matches the direction of the twist in the cord from that tablet. Conveniently, this means that the band looks like the pattern. Pattern drafts and threading diagrams are read from bottom to top. For the threading diagrams, when the tablet is turned forward, holes A, B, C, D successively occupy the near top corner (thus avoiding the question of whether to label your tablets clockwise on the left face or counterclockwise on the right face).
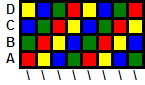
First Law of Tablet Weaving: The color that crosses the top of the band when the tablet is turned is the one that will show in the band.
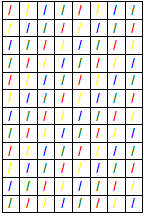
Threading: In the normal form of Snartemo, tablets are threaded with four colors, and arranged in a staggered fashion, so that turning the pack forward produces diagonal stripes. For convenience, all tablets are S-threaded. The following figures show the threading draft used for the following examples, and what the band would look like if all tablets were turned forward.
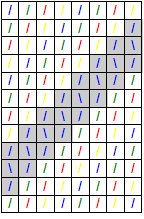
The third figure shows the basic Snartemo structure. The turning direction of adjacent tablets is reversed in sequence to create a wide diagonal line made up of blue floats (shaded for emphasis). Note that the sequence of colors resumes after the wide stripe. I think the easiest way to understand Snartemo patterns is to look at examples. It also helps to sit down with graph paper, colored pencils, and a practice warp, and try various figures until you see how the technique works.
I draft patterns for Snartemo and 3/1 broken twill as an iterative process, often using colored pencils and graph paper because I enjoy them. A spreadsheet can be used, as I did for this handout, and there is software available for aiding you as well. Let’s say I want to weave pair of interlocking diamonds. Working from the bottom, I draw in the first diamond, starting at the bottom point and working upwards, filling in the three-square lines of the pattern. To get a smooth diagonal, the outer lines of the three-square unit must follow the direction of the pattern line (as for 3/1 broken twill). I think of the Snartemo pattern elements as being little diamonds drawn in 4 squares. You can build a lot of patterns out of adjacent little diamonds, and they will nearly all look nice when woven.
If I want the first diamond to be red, as shown, the second one must be blue if the two diamonds are to be equally spaced, since blue and red are in opposite corners of the tablets. There could be 1 or 5 squares between the pattern elements (or 9, or 13, etc.), but I think 5 looks best.
After both pattern elements are sketched in, the third step is to fill in the background around them. The beginning and end of this band are easy – just narrow diagonal stripes. One thing to be careful of- when you are working with four colors, the color sequence when turning forward is NOT the same as the color sequence turning backward, so not all the diagonals will match up! Yellow comes before red when turning forward, but green comes before red when turning backward. Threading the tablets in three colors, red-blue-red-yellow for example, would eliminate this problem.
It’s easy to fill in between the pattern pieces when there’s no change of direction, when both the pattern elements are slanted the same way. The difficulty comes when there’s a change of direction. Those problem elements are shaded on the pattern figure. This is where experience, or trial-and-error, come into play. What’s the best way to fill in those areas? First I fill in the color adjacent to the pattern elements, and going in the same direction (already done in the shaded diagram). The color sequence is rigid, but there is almost always more than one way to “fiddle it” into place. There will often be floats; like drafting for 3/1 broken twill, sometimes this is unavoidable.
The three-turn “box” float patterns are the simplest to work with. Careful examination of the band from Snartemo will show floats of 2, 4, 5 and even more turns. These can snag in the finished band. Using a wool warp and fulling it after weaving will eliminate this problem.