Sprang Bags
Sprang is a type of interlinked or intertwined fabric. To get an idea of how it is made, think of braiding 3 strands of yarn which are fixed at both ends. The yarn at both ends is braided with an open area in the middle, and the two ends are mirror images. That braid is a small piece of sprang. If more strands are used, the fabric can have a complex pattern of large and small holes, or any number of other variations.
Sprang has a very long history. The oldest example of sprang (found in a bog in Denmark) dates from 1400 BC, and the technique was probably in use in Scandinavia through the 18th century. Sprang has been used for articles that need to be slightly stretchy, like stockings, and also for open-work like hairnets, and decorative items such as belts. Making a sprang bag is a fairly simple, quick (a couple of hours) and practical introduction to this technique.
What you need:
- yarn- something fairly sturdy. I use a medium-weight cotton for bags. If you want to use more than one color, the bag will have vertical stripes.
- sticks- 4 or more thin sticks to hold the shed in place. Knitting needles work well, as do bamboo kitchen skewers.
- frame- something to hold the yarn at a fairly even tension and spacing.
Since the tension of the yarn increases as you work, there has to be some way to adjust the length of the frame. For small sample pieces, a bent wire coat hanger works well, although you have to cut the coat hanger to remove the sample if you wrap the yarn around the wire. A more elaborate frame can be made from a canvas stretcher frame, two pieces of dowel, and some cord. (Frame pieces are available from art supply stores in a variety of sizes, and are cut so that 4 pieces fit together to make a fairly sturdy frame.) I have a large frame constructed especially for sprang work. The completed bag will be somewhat less than half the length of the frame.
Frame made from canvas stretchers:

Once you have everything assembled, tie the end of the yarn to the top left corner of the frame. Leave a tail at least half the length of the frame, to use to lace up the sides of the bag. Bring the yarn down the front of the frame, behind the bottom of the frame, and back up. Keep wrapping the yarn around the frame until you have 80-100 strands of yarn crossing the center of the frame (40-50 complete wraps.) (This is the size of bag I have, and a convenient size to make on a 36-inch frame.) Using a multiple of 4 strands makes working sprang easier, but it isn’t essential. (There must be an even number of warp threads- the warp yarn starts and ends at the top of the frame.) Tie the other end off to the top right corner of the frame, also leaving a tail. If you are using more than one color, tie the ends together at the top of the frame (without leaving a tail.) Try to keep the tension even as you wind the warp.

If the warp is wound correctly, half the strands of yarn will lie entirely in front of the frame, and the other half will lie entirely behind it. Starting at the right side, weave one of the sticks through the warp. Pass the stick behind the rightmost bottom strand, then in front of the rightmost top strand, and so on, finishing by passing the stick in front of the leftmost top strand. Insert another stick in the same shed, and push one to the top of the frame and the other to the bottom.
Sprang is always worked from right to left, so you will use your left hand to hold the current shed in place as you work, and your right hand to manipulate the threads, forming the new shed. The method I have found easiest for holding the warp is as follows: put your left index finger in the shed, with your thumb on top of the warp and the rest of your left-hand fingers beneath the warp. This holds the top layer of the shed between your left thumb and index finger, and the bottom layer between your index finger and other fingers, leaving your right hand free.
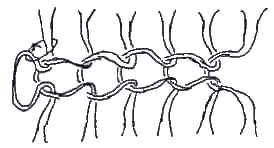
The basic form of sprang is an interlinked mesh. It is made by alternating two rows of manipulation. For the first row, pick up the rightmost back 2 threads with your right index finger, and drop the rightmost thread behind your finger. Continue across the warp by picking up 1 back thread and dropping 1 front thread. When you reach the left side, the last manipulation will be to pick up 1 back thread and drop 2 front threads. Put two sticks in the shed, and slide one up and one down, packing the twists tightly at the top and bottom of the frame. For the second row, start by picking up the current back right thread and dropping the front right thread. Continue across the warp. Remove the top- and bottom-most sticks from the sprang, put them in the shed and slide one to the top and the other to the bottom, packing tightly. (Make sure you don't remove the sticks you put in after the last pick, but the ones which have been in place longest.)
The manipulations to produce basic sprang can be summarized as:
- 2F/B…F/B…F/2B
(This notation is written from right to left, and the position next to the slash indicates where the threads are moved to. This row denotes: pick up 2 from the back, drop one from the front. Repeat: pick up one from the back, drop one from the front. End by picking up one from the back and dropping two from the front.) - F/B…F/B
(Repeat: pick up one from the back, drop one from the front.) Again, the directions are read from right to left. Repeat these two rows as desired.
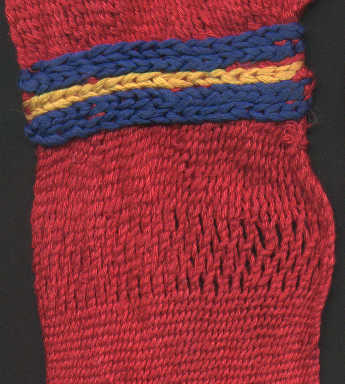
The second form of sprang produces a larger mesh, which also tends to be more stable. This is the form I prefer for bags. It consists of a repeating 4-row sequence:
- 2F/2B…2F/2B
- F/B…F/B
- F/B…2F/2B…F/B
- F/B…F/B
This detail from a sprang baldric shows a band of the larger-mesh sprang between two bands of basic sprang:
You have probably noticed that if you remove the sticks from the shed, the fabric you have made will all come undone. Something has to be done to finish the fabric. One very simple method is to continue the sprang until the two edges are too close together to continue, then put a string through the last shed and tie it to both sides of the warp. The method most used in medieval Scandinavia is a bit more complicated but makes a sturdy bottom for the bag. It is similar to the chaining used in crocheting. Remove all but one of the shed sticks. Slide the stick to the left slightly to allow you to lift the rightmost pair of threads. Reach underneath them from the right to pick up the next right most pair and bring them to the top, releasing the first pair. Continue from right to left, gradually sliding the stick out and chaining pairs of threads. A crocheting hook may be helpful. Use a small piece of string to tie the last loop to the edge of the warp. At the top edge of the frame, untie the starting knot in the warp yarn and retie it to the adjacent warp thread. Do the same with the ending knot. You should now be able to remove the sprang from the frame without it falling apart!
Lace up the sides with the tails you left in the warp and thread a drawstring through the top loops- you have a Viking bag!