Lucet
The lucet is a two-pronged gizmo used for making cord (although there can be 4 or more prongs, and spool knitting is an adaptation). Mine looks like this:
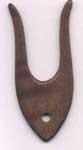
Mine is about 4 inches long, but the size depends on what is comfortable for you to handle. Other lucets have long handles. I’ve never used one which has a handle, so I can’t comment.
This curvy wooden gizmo seems to be a Victorian invention, like so many of our modern string toys and techniques.
There are a number of early finds considered by some to be lucets, even though there are no examples of lucet cord. The Viking lucet is a piece of hollow bone 5.6 cm long. One end was carved into two prongs. This example was found at Lund, Sweden, no specific date given. I have no idea what specifically led them to conclude that this was a thread-maker and not some other gizmo, but it could certainly be used in that fashion.

There is a photo in:
Graham-Campbell, J. 1980. Viking Artefacts: a select catalogue. British
Museum Publications, Ltd., London.
Another book by Graham-Campbell and Kidd (The Vikings; 1980; Tabard Press, New York) has a description but no picture.
Using a Lucet
This is a low-equipment hobby. If you don’t have a lucet, but want to try cord-making, it can be done with two pencils, over your fingers, a two-tined fork, anywhere with two prongs.
The technique is extremely easy to demonstrate, not so clear to describe…
Hold the lucet in your left hand with the prongs up and a flat side towards you. If the lucet has a hole at the base, put the free end of the thread through it from the front, otherwise just hold the thread there with your left thumb. Wrap the yarn around the back then the front of the left prong, and then around the back then front of the right prong, so the yarn makes a figure 8 around the prongs and ends up running back between the prongs.
Turn the lucet clockwise (as seen from above), which has the effect of wrapping the yarn around the peg which is now on the right.Lift the bottom loop over the top loop on the right prong, and pull the yarn to tighten the loop.
Turn the lucet clockwise… repeat until done.
An alternative method is to wrap the yarn around the lucet again, in the same way you did to set it up originally. Then lift the bottom loop over the top loop from the right prong, followed by the left prong. Wrap the yarn… This way, you always hold the lucet with the same side facing you.
The preferred method is entirely a matter of choice.
This process makes a very tight and sturdy square cord.
Beaded Lucet Cord
I learned this technique at Pennsic, and was quite pleased with it. It takes two threads, the main working thread and a second beading “weft.” This extra strand will show at the edges, so color choice is important. The effect can be minimized by using a thread that is much thinner than the working thread, and in a similar color (sewing thread perhaps). Thread all the beads onto this second thread (a bobbin might be useful for this thread, although I’ve never used one.)
Start the lucet cord the usual way, and work until the cord is established and sturdy (and you get close to the section where you want beads.) Take the end of the beading weft, and lay it across the center of the lucet, across the developing cord. Do a loop or two of lucet cord, then pass the beading weft back across the lucet cord. Do this a couple of times until the beading weft is firmly fixed into the cord.
Now, whenever desired, leave a bead behind with the beading weft when you cross it over. With this method, you can put beads on one side of the square cord, or on opposite sides, and at any spacing.

Two-color Lucet Cords
Two-color cords are also very easy. Start the cord with one color, and after a couple of wraps, lay the other string over, and do a couple of wraps with the second color. Alternating back and forth regularly gives a banded cord. This isn’t a good method for long blocks of color, since the unused string makes a float over the cord.
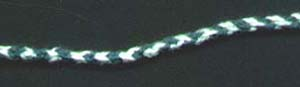
This cord was made by switching colors after every complete wrap (both prongs).

This cord was made by switching colors after every two wraps.
Lacis has published a book on lucets with several other techniques, Lucet Braiding: Variations On A Renaissance Cord by Elaine Fuller.
Spool Knitting
Spool knitting (or knitting nelly) is closely related to lucet work, but uses more pegs. The traditional form (a children’s toy) has an even number of nails (usually 6 or 8) driven into a wooden spool.