One Pack 3/1 Broken Twill
This is an advanced tablet weaving technique. If you are new to tablet weaving, you might want to check out my basic tablet weaving page first.
These instructions are for the one-pack method. I learned Peter Collingwood's two-pack method first, but I now teach the one-pack method almost exclusively. It is slower for simple patterns or solid areas, but is easier to work with for complex patterns and provides a smoother transition to more complex techniques. Twill is also discussed on the tablet weaving theory page.
Background
Tablet-woven 3/1 was used to create some of the most elaborately patterned bands of the Middle Ages. Collingwood's Techniques of Tablet Weaving (TTW) illustrates some amazing examples, including the maniple from Arlon, which is my favorite piece of tablet weaving.
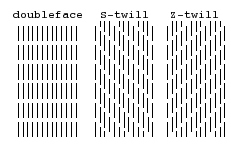
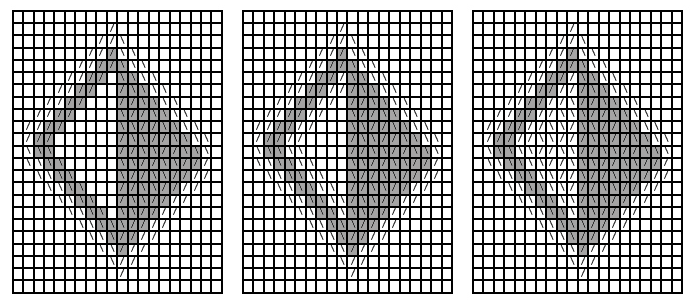
3/1 twill isn’t that different from doubleface. The tablets follow the same sequence (ffbb; Fig. 1) to create a fabric that is all dark on one side and all light on the other. The ffbb turning sequence creates a fabric where the warp threads each go over 3 and under 1 weft thread. In doubleface, the 3-weft floats are all parallel across the band, so this could be called 3/1 repp, but in 3/1 twill the floats are staggered along diagonal lines (Fig. 2). The diagonals can run in either S or Z directions.
Figure 1. Sequence of tablet positions for double-faced weaves. At least one dark thread is always on top, and crosses the top with each turn, so the upper face of the band will be dark.
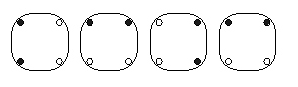
Figure 2. Alignment of floats for three double-faced structures.
The strong diagonals in 3/1 broken twill make it possible to design elaborate patterns based on diagonal lines, but make it impossible to weave smooth horizontal lines.
Weaving twill
There are two ways to weave 3/1 twill. The two-pack method was developed by Peter Collingwood, and is faster for large areas of plain ground and for simple patterns. The one-pack method is easier to understand, and it is easier to move from the one-pack method to other structures, especially Snartemo. I'm only going to cover the one-pack method here.
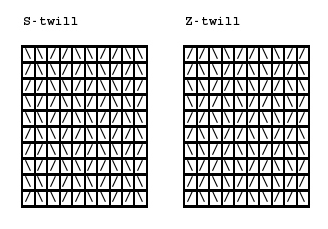
All the tablets are S-threaded with two light and two dark threads in adjacent holes (as in Fig. 1). It has become conventional to draft patterns on graph paper, using / to indicate a forward turn and \ a backward because those are the directions of twist created by an S-threaded tablet turned in the appropriate direction. The twill direction is indicated by the parallel lines of / or \ running in the appropriate direction (Fig. 3).
Figure 3. Pattern draft for single-color S and Z twill. The slashes line up along the twill direction.
Changing color
Plain twill isn’t all that interesting - the fun part is making designs. There are several possibilities, but the easiest way to change colors is to turn the tablets 4 times in the same direction, then resume the regular ffbb sequence. In Figure 3, the slashes lined up along the twill line. When changing colors, the color change also needs to follow the twill line, so the color change shows up on the pattern as 4 parallel slashes along that line (Fig. 4). The color change actually happens in the middle of that broader line. With this kind of color change, the twill direction is the same on both sides.
Figure 4. S and Z color changes.
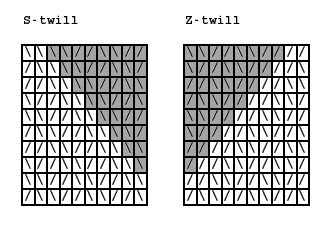
To come out smooth, the color change always has to match the twill direction, so that technique lets us make patterns of diagonal lines all going in one direction. Again, not very interesting. Even the simplest diamond requires diagonals going in both directions. Since the color change must match the twill direction, the only solution is to change the twill direction. Twill direction is changed by shortening the turning sequence (Fig. 5). The sequence only changes for every other tablet - where there are 2,6,10, http://www.stringpage.com. picks between the change in direction.
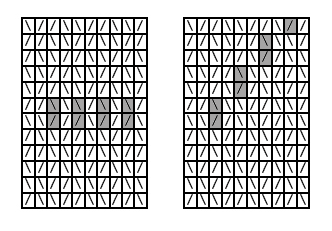
Figure 5. Two ways to change twill direction. The one on the left changes in the middle of the area, while the one on the right changes just before the boundary. The points where the turning sequence has been changed are shaded.
Twill has long floats, so bands should have warp-twined selvages. These are made with 2 or more tablets always turned the same direction, and only reversed when too much twist has built up. Warp-twining creates a sturdy edge and prevents the floats from snagging.
Putting it all together
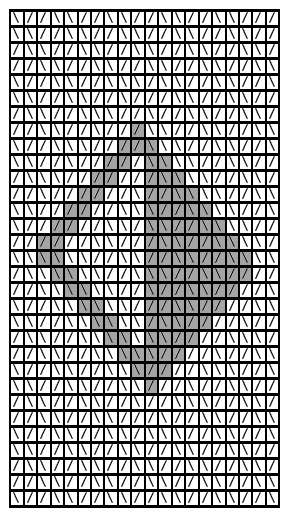
I’ve found that the easiest way to draft patterns is to start with the pattern itself and work backwards. Let's try a diamond with one side filled in and the other hollow.
-
Sketch the outside of the diamond using two parallel slashes in the direction of the color lines. The point of the diamond must be made with one card instead of two (not completely symmetrical).
-
Fill in the solid half, working from the edges inward and putting the twill direction change along the middle of the diamond.

-
Color changes are made up of 4 consecutive turns, so add those turns to the outside of the diamond, and to the inside of the hollow half.
-
Fill in the hollow half.
- Fill in the background. The decision on what twill directions to choose will depend on your overall plan for the band. For whatever reason, I want this diamond to appear on a background of S-twill.
To weave this pattern, you need to set your tablets up based on the first two rows of the pattern (read from the bottom). If they are both forward (/), the tablet must have the surface color in the two holes closest to you. If both turns are backward (\), the surface color is in the farthest holes. If the two turns are different, the surface color is in the top two holes.
This pattern could have been done differently to avoid the long floats at the points of the diamond, but I wanted to illustrate the simplest way of drafting it.